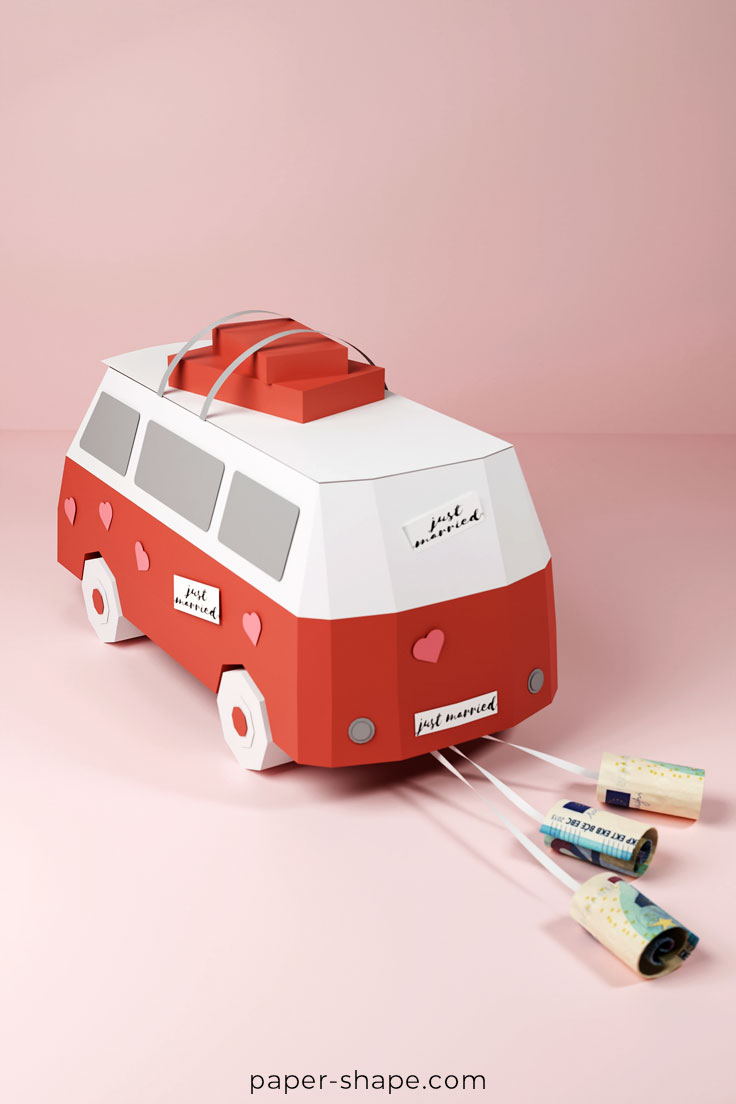


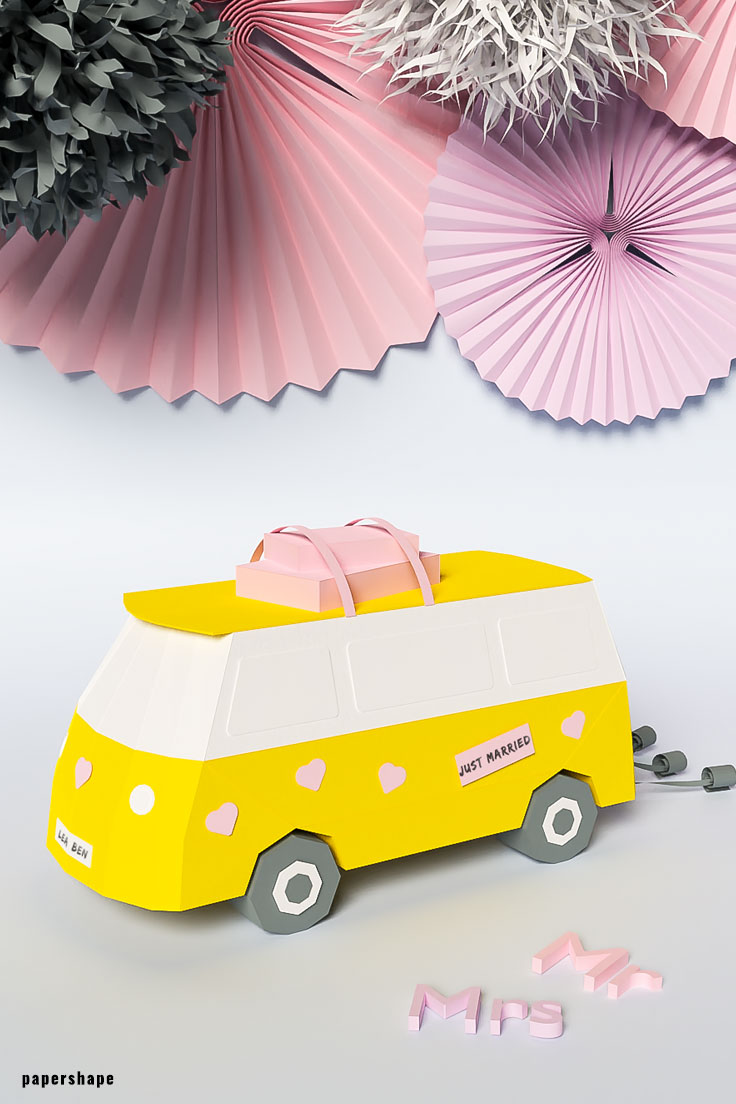
How to make an old-school papercraft van for the bride and groom as a wedding gift
Money gifts for a wedding are very popular - at least in Germany. In most of the times they are explicitly requested by the bridal couple at the invitation (for the honeymoon or the travel budget in general)
If only there was not the recurring question: how do I wrap the money gift nicely? On Pinterest, unfortunately, there are not many gift ideas for the wedding, so that the gift tables look more and more the same - who do you want to blame.
In this DIY post I show you a creative and funny packaging idea for adventurous and nature-loving bridal couples: a retro-chic van which of course travels with two old-school suitcases. You put into the suitcases your money and use them directly as your wedding card.
Think about this additional idea: Let all guests sign the van and make your wedding gift a unique memento for the couple.

How to wrap a wedding money gift as a paper van: step by step instructions
Materials needed
- Download the template
- 6 colored papers in four different colors (8.5in x 11in) (weight: 65lb-110lb)
- Glue or double-sided tape
- Scissors
- Ruler
- Bonefolder / awl / ball pen refill etc.
- Cutting mat
- Pencil
1. You need a total of 6 DIN A4 pages in the colors of your choice. I have printed the pages 1 + 2 in white, the pages 3 + 4 in yellow, the page 5 in gray and page 6 in pink. I recommend to use paper with up to 230g/m². Print out the template and cut out all solid lines with scissors.
2. Fold all dashed lines with an awl and a ruler. Put the ruler next to the line and ride the awl after.
3. Fold the long dashed lines away from you, i.e. downward. Fold the short dashed lines up, i.e. up to you. The long dashed lines can only be found on the paper parts J-M and the hearts.
4. We start with building the bus: IT starts with the paper part A and ends with the paper part R. The glueing part is pretty simple because I numbered all the paper parts in the right order for you. Each number exists twice, so each pair of numbers belongs together. You start with the no. 1 on the paper part A which you glue to the no. 1 on the part B (therefore 1-B or 1-A). Then you stick no. 2, 3, 4, etc. This order is the only pattern you have to stick to.
5. For gluing the parts together you can use double-sided adhesive pads or normal (dry / liquid) glue. At 230g/m² every glue is suitable. Only the dry time is different, hence how long you have to press the paper parts together. Apply the adhesive to the tab side with nothing printed on it.
6. The paper parts N-Q are the wheels and are not glued directly to the bus. First you make them individually as wheels and afterwards you stick them to the bus. Here are two more decorative elements from page 2 and 5, which you should stick on now. In the video you'll see how I stick the three wheel modules (wheels, wheels A + B) together.
7. Now we attach the last paper part R to the bus (it is the car roof). To do this, cut out the cords for the car roof, bend them at the intended location and stick them on the markings on the car roof. I show this step in the video as well.
8. Now fold the suitcases and put them together. You do not need any glue for the suitcases. They serve as a greeting card (here you can write your individual text) and offers space for your money gift.
9. Now let's come to the final fun part: the decoration. There are lights, hearts, just-married signs, car number plates, windows and, of course, drinking cans to be pulled up behind the old-school bus. It is up to your creative whims how much time you want to spend with it.
10. For the drinking cans, cut the 3 rectangles on page 5 and roll them up from the short side, creating a tight spiral. This is your first drinking can. Repeat this step with the other two rectangles as well. Cut also the corresponding bands from page 5 and twirl them up slightly. They have different lengths, do not be surprised. Glue each of these tapes to a drinking box. I have simply unrolled the drinking can, taped the string on it and rolled it up again. Finally, you take all three strings together and stick them to the back of the bus.
11. The hearts are available in two different sizes. Cut and fold the two rectangles from p. 6 in the middle so that you have to cut only half of the hearts. It's up to you where you put these on.
12. In the video I'll show you how the further decoration is attached to the bus (like the lights etc.).